Installing a Rostra FrontZone 250-1920-FZ Ultrasonic Parking Assistance System on a 2018 Honda Clarity
Posted by Russell Wright on June 9, 2019
I love my Clarity. But, I don’t feel comfortable knowing where the long front end is when I park the car. So I embarked on adding some ultrasonic sensors to the front. I suppose I could’ve added a camera, but I was looking for something a little less obvious in the cab.
This is not for the faint of heart. It requires drilling holes in the bumper of your new car. I was, however, able to do this without removing the bumper.
I ordered the Rostra FrontZone 250-1920-FZ from SavingLots.com. $93 + 12.50 shipping: $105.50. I found the kit to be very complete and professional.
Something to note. The Rostra system has a CAN interface that is supposed to detect when the vehicle is moving a certain speed (off at 10 mph and on at 6 mph) and disable/enable the system. This only works on 11-bit CAN systems and my experience with attaching it to the OBDII port with the included connector has been disappointing. I keep getting the E0 message. At this point I’m not sure whether there is an incompatibility issue or not, as I understand most CAN-B (29-bit) systems can understand CAN-A (11-bit systems). I have sent a question in to Rostra, but as of 6/9/2019, they have not responded. I’m going to be rather torqued if they never respond!
“If the ECU is disconnected or getting incorrect information from the CAN-BUS interface, “E0” will be displayed and the system will sound 5 beeps consecutively.”
I first had to determine where to mount the sensors. I decided I wanted two of them to be low (closer to the curb) and the others to be in the approximate locations recommended by the installation template.
For the sensors in the bumper, I measured from the car centerline…approximately 795mm. After measuring, I pushed on the bumper and looked behind it with a light to make sure I could see where I was pressing and there was adequate clearance. I marked the distance with a grease pencil and then measured to center the vertical distance. I used a level to plumb the measuring lines. I double and triple checked my clearance.
For the low sensors, I installed them in the black plastic trim area. Perhaps I should’ve gone lower, but this seemed to be a good compromise of keeping them at the recommended 12” minimum height. I drilled these first and actually used the drill for a metal bumper, so I had to install the rubber grommet retainers. No big deal…they fit nice and snug. And no painting required!
I painted the two mounted in the bumper with some white enamel paint. I looked at trying to exactly match the pearl, but the would’ve required spending $75-100 on a multi-step paint. Close enough. Finish them off with some rubbing compound and a little wax.
The wiring part came next…and this was not easy. I drove up on some ramps and removed one of the under covers. This required removing 14 or 20 clips and a couple of bolts. Not hard, just watch out for dirt dropping in your face! I didn’t get any good pictures of this part of the process, but here are the clips and the cover, so you can get the idea. This allows access for the wiring.
To get the wiring to my holes in the bumper, I used a piece of stiff wire to which I taped the ends of the wiring harness and fed them from below to the hole in the bumper. I used a pickup tool or pliers to grab the end of the harness I was feeding from below.
Now for the part that took me hours to figure out. I needed to get the harness through the firewall, but I really didn’t want to be drilling holes, mainly because there’s just not much room to work. After messing around for hours, I finally determined I could shove the harness through the side of one of the big wiring harness grommets. Here are some pictures of this from the firewall side. Of course, you have to have access on the cabin side as well.
This first one shows how I was able to lift up the side of the grommet and, using a long screwdriver, pull it away from the edge enough to shove the harness through. You can see the grommet that was on the wiring harness that would be intended to fit in a drilled hole.
Here’s another shot showing more of the large factory wiring harness grommet. The red wire is my trailer hitch power wire I ran when installing my trailer hitch wiring.
And here’s another shot. There is a factory plastic clamp (unused) that I commandeered as part of the wiring harness retention system. I subsequently secured the harness with wire ties.
To access the cabin side of things, you can remove some trim pieces to gain access. There are basically four trim pieces I removed.
The driver’s dashboard lower cover. It just pulls away when you pull in the clip areas. No screws to remove.
Here are some pics of the back side of the dashboard lower cover so you can see the white clips and the connector locations.
The driver’s kick panel. Pull it toward the passenger side to remove the clips.
The door sill trim piece comes off by pulling straight up. Not sure if you really need to remove this or not.
The side cover for running the wire for the display.
Location of the clips on this cover.
With the cover removed you can easily run the display wire to my location of choice.
This is my display location, before it was stuck down with the included double-sided tape.
Here’s the final location. Very unobtrusive and out of the way.
To be able to turn the whole thing off, should it decide to beep randomly (and to account for taking it through car washes), I installed the included switch in the right hand blank. The blank pulls out and I did some drilling and modification of it to allow the switch to snap in. Again, you can’t even see this after installation.
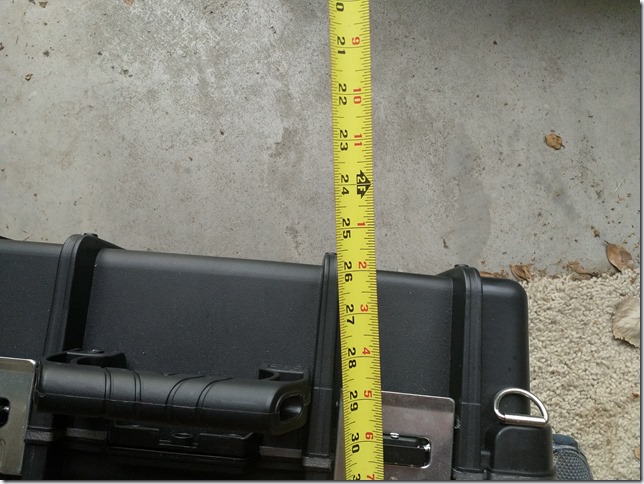
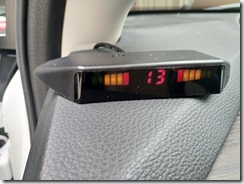
After it was all hooked up I did some testing. I used a small Pelican case as my target. Here are the display readouts along with the associated tape measure “read out.”
The sensor is actually a 2-3 inches back.
This is the measurement to the bumper. Anything less than 12 inches causes the display to beep constantly…as in “don’t go any further!”
Pretty accurate. About 22” inches from the driver’s side.
At about 30 inches from the passenger side.
Right in front.
Measured from the license plate…that sticks out about 3-4” from the sensor location.
Overall, I’m very satisfied with the accuracy.


Leave a comment